


Are you looking for ways to keep the kids busy while they’re cooped up? Break out the craft supplies and try some of these awesome holiday craft ideas!

Cork Reindeer Ornaments
Materials: corks, mini red pom poms, googly eyes, tacky glue, a sharp knife, pipe cleaners, ribbon, and straight pins.
Directions:
1. Glue eyes and nose to cork.
2. Cut a pipe cleaner in half. Make a “t” with the two halves and twist the horizontal piece around the vertical piece to create an antler. Repeat this with a second pipe cleaner and you will have two antlers.
3. Use a knife to cut a slit into the top of the cork. Be careful! I placed the cork on its end on a table, which allowed me to get enough force to create a slit deep enough.
4. Push the two antlers into the slit.
5. Cut a length of ribbon and make it into a loop. Use a straight pin to attach it to the top of the cork.
And that’s it! Easy, last minute ornaments your kids will love.
Source: Blog.VickyBarone.com
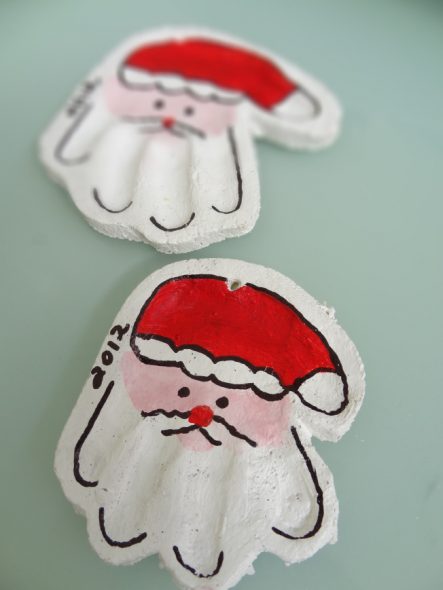
Salt Dough Santa Handprints
Salt Dough Ingredients:
1/2 cup salt
1/2 cup flour
1/4 water (give or take)
(These measurements allowed me to make two thick handprints, with a little dough left over)
Method
Knead ingredients together until dough a forms.
How to make your Santa Ornament:
1. Roll the dough out and press your child’s hand into the dough. With a sharp knife, cut around the imprint, leaving a small border. Using a skewer or the tip of the pencil, make a small hole at the base of the handprint so that it can be hung once it is baked.
2. Place the ornaments into a 90 degrees celsius oven and bake for 3 hours
3. When cooled, paint the whole ornament white. Using some red and pink paint and a black marker, fill in the features of Santa’s face, beard and hat. Use mine as a guide or make your own creation.
Source: ThereWasACrookedHouse.wordpress.com
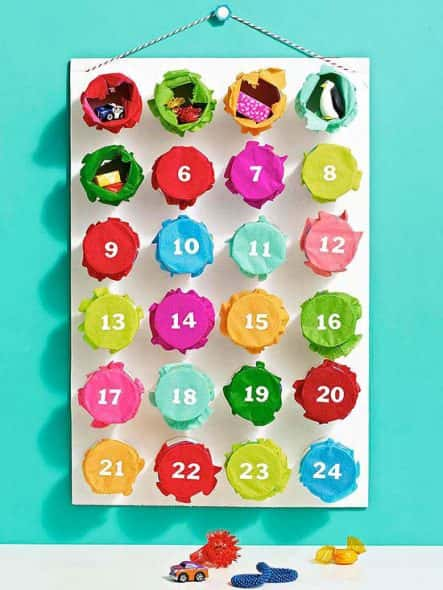
Prize Surprise! Advent Calendar
Add a dose of color and whimsy to your Christmas countdown with this punch-out Advent calendar.
1. For the base, cut a 10- by 15-inch piece of corrugated cardboard.
2. Cut 12 toilet paper tubes in half, then paint the tubes and the base white.
3. Dip the bottoms of the tubes in tacky glue and place them on the base in a grid, leaving about a half inch of space between them. Let the glue dry.
4. Cut tissue paper into 48 (3 1/2-inch) circles. Inside each tube, place a treat, then lay two tissue paper circles over the top of the tube. Stretch a small rubber hair band over the tissue paper and the tube so that the paper is taut.
5. Add vinyl number stickers to the tissue paper.
6. To hang your calendar, cut slits near the top of the cardboard and insert a loop of string into them.
Source: Parents.com
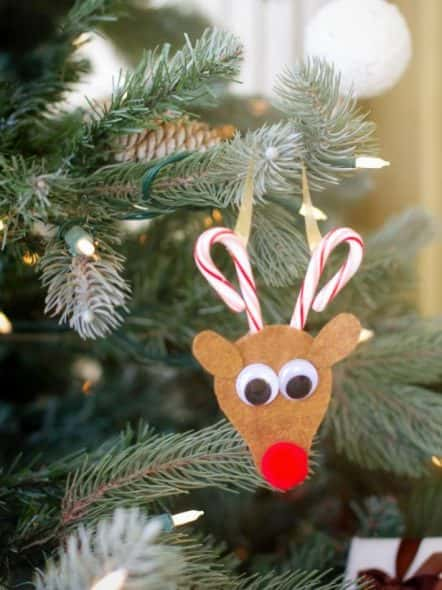
Candy Cane Reindeer Ornament
Materials Needed:
brown felt
scissors
hot glue gun and glue sticks
red and/or black pom-poms
pencil
googly eyes
1/4″ wide ribbon
mini candy canes
Download: Reindeer Head Template
Cut and Trace Template: Use scissors to cut out the reindeer head template. Create two reindeer heads by tracing the template shape twice onto a piece of brown felt. Attach Nose and Eyes: Hot-glue a pom-pom nose onto the bottom of one of the reindeer heads then attach two googly eyes to the face, above the pom-pom nose. Create Pocket for Candy Canes: Cut 2 small felt ovals for ears and attach those beside each eye. Hot-glue the two pieces of felt together, keeping the top portion of the head open. Attach Candy Canes and Ribbon: To create the antlers, hot-glue two mini candy canes inside the top of the reindeer’s head. Hot-glue a 1/4-inch wide piece of ribbon to the back of each candy cane to create a hanger. Once glue cools, hang reindeer ornament on the tree. Tip: These cute critters would also make great gift toppers.
Source: HGTV.com
Click here for photo instructions!
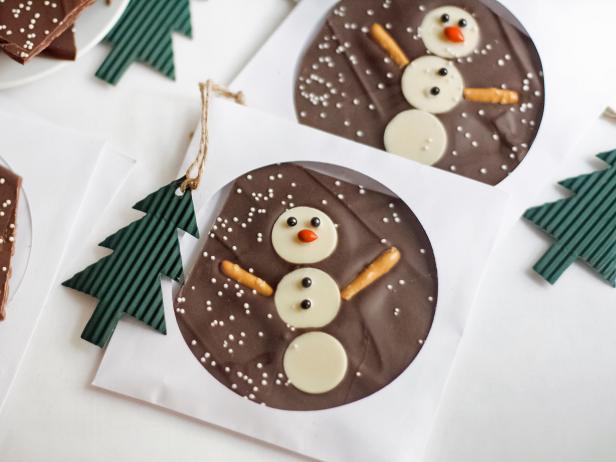
Snowman Chocolate Bark
Materials Needed:
1 package (1 lb.) chocolate almond bark
12 ounces white vanilla meltable round candy wafers
1 tablespoon white nonpareils
10 pretzel sticks
black nonpareils or mini chocolate chips
10 orange candy-coated chocolate-covered sunflower seeds
10 paper CD sleeves with cellophane windows (can be found at office supply stores or purchased online.)
parchment paper
silicone spatula
Create Chocolate Sheet: Cover a large baking sheet with parchment paper. Melt the chocolate bark in the microwave at 30 second intervals until completely melted and smooth, about 1 minute 30 seconds. Spread the candy onto the prepared baking sheet in a rectangular shape to 1/4-inch thickness using a spatula. Assemble Snowmen: Quickly press white candy wafers into the chocolate, well-spaced in groups of three to mimic the body of a snowman. Break pretzel sticks to desired size for the snowman’s arms and press them into the chocolate. Sprinkle nonpareils over the entire sheet of chocolate for a snowy appearance. Complete Snowmen: Melt 2 ounces of the white wafers in the microwave at 100 percent power at 30 second intervals until melted, about 30-45 seconds. Transfer to a disposable piping bag or zip-top bag with the tip snipped. Pipe a dot of candy onto the center of the candy wafer designated as the snowman ‘head’ and add an orange candy sunflower seed for the nose. Add two dots of candy above the nose and attach black nonpareils for eyes. Add two dots of candy on the wafer below the head and add black nonpareils for buttons. Repeat process with remaining snowmen. Let the candy stand until set, about 30 minutes. You may transfer the sheet of bark to the refrigerator to speed setting time. Creatively Package: Score the bark around each snowman using a knife and break into appropriately-sized pieces to fit inside each CD sleeve. Seal each sleeve with cellophane tape or a self-adhesive sticker, then add a festive gift tag or bow.
Source: HGTV.com
Click here for photo instructions!

DIY Holiday Photo Props
Materials Needed:
assorted poster board, construction paper or light-weight cardboard
cotton balls
headband
glue (hot glue and white school glue)
scissors
markers or acrylic paint sticks
yarn
18-gauge wire
tape
You can make a Silly Santa Mask, Create Elf Accessories, and Design Your Reindeer Ears (and Nose)!!
Click here for full instructions!
Source: HGTV.com
I hope you enjoy these Holiday Craft! Let me know which one is your favorite in a comment below!
Until next time!