


Are you looking for ways to keep your kids entertained during the cold weather? Well what better way than to let them express their creativity and get them in the Thanksgiving spirit? There are so many awesome craft ideas out there for the season.. From Autumn Mobiles to Pinecone Turkeys.. there’s something that everyone is sure to enjoy. Below are just a few of the neat ideas out there on the internet.
I have listed the full materials and instructions for your convenience! I hope you like them!
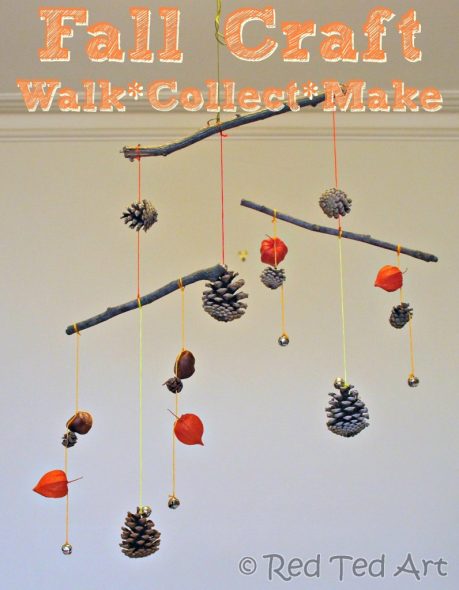 Autumn Mobile
Materials:
Sticks
Pinecones
Phyaslis
Acorn tops
Little bells and embroidery thread for hanging
1) Layout your mobile on your table – roughly in the order you would like to have it. We kept ours fairly symmetrical, because, uhm, we like symmetry! We used one “main twig” for the top and then two smaller ones. Finishing each strand with a little bell.
2) Using your string or embroidery thread, tie all your items together – we made a hole in the chestnuts (difficult to do, so we only used two chestnuts and tied the thread around everything else. We used autumn colours of red, orange and yellow. To make it balance, you will have to shuffle the strings up and down the sticks a little. A great “experiment” in learning about “balance” and what happens when one end is lighter than the other!
Source: RedTedArt.com
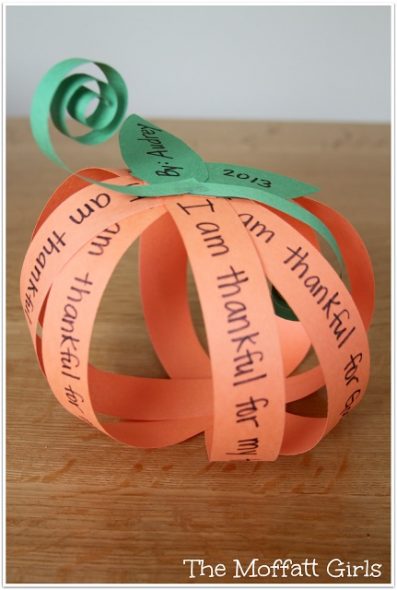
Thankful Pumpkin
Materials Needed:
Orange and green construction paper
Staples or brads
Scissors
Directions:
Step #1) Cut out 8 pieces of orange contraction paper into 1 inch strips. You will also need to cut out 2 leaves and 2 skinny strips of green contraction paper for the vines.
Step #2) Have students write something they are thankful for on each strip of orange construction paper. Be sure to leave about a 1 inch space on the sides of the strip so the writing isn’t covered up when stapled together.
Step #3) Use a stapler or brads to attach the orange strips at the top and then at the bottom to form a pumpkin.
Step #4) Add your leaves and green vines. I rolled up the green construction in a paper to help curl the vines.
Source: TheMoffattGirls.com
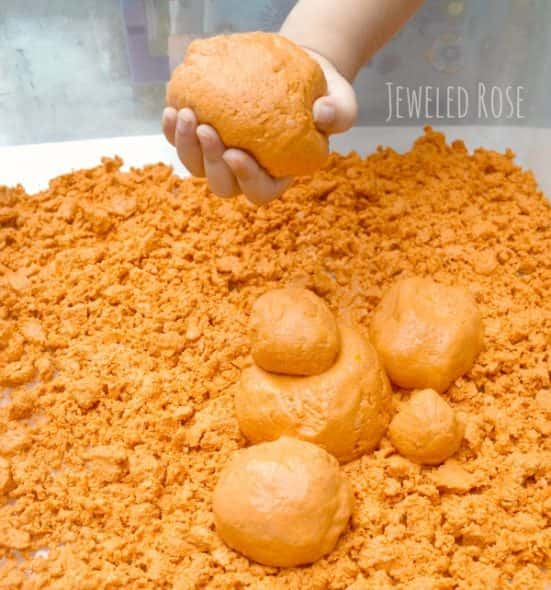
Pumpkin Moon Sand
What you’ll need:
4 cups of play sand
2 cups of corn starch
1-3 cups of water
1 tsp of pumpkin pie spice
Optional: orange food coloring, liquid watercolors, or powdered paint.
Directions:
1) Begin by mixing the play sand, pumpkin spice & the corn starch in a large sensory bin or container.
2) Add the desired amount of powdered paint or food coloring at this time. (if color is desired).
3) Then, slowly begin to add water to the bin and mix.
4) Slowly add more water & mix until the desired consistency is reached.
5) You can use more or less water to create different consistencies. More water will give you a slimier sand, and less water will give you more of a playdough-like sand. (Note: We started with one cup of water and added more as we played.)
6) Once everything is good and mixed play can begin!
Source: GrowingAJeweledRose.com
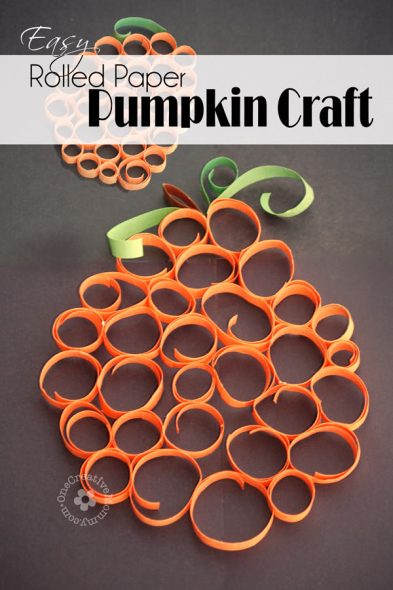
Rolled Paper Pumpkin
Materials:
Paper (orange, green and brown)
Scissors
Glue
Instructions:
1) Cut paper (construction paper, card stock or copy paper) into 1/2 ” strips. (You’ll need plenty of orange, a few green, and one brown strip for each pumpkin.)
2) Cut one brown and a few green strips for each pumpkin that you plan to make.
3) Begin with the orange strips. Roll each strip and secure the end with a bead of glue. Pinch the glued spot between your figures for 30 seconds or so. Don’t try to make the curls all the same size. The pumpkins have a lot more character when the sizes are different.
4) (If you have time and patient kiddos, you can glue the beginning of the paper curl and the end. It makes the curls look cuter, but is more difficult.)
5) Once you have made about thirty orange curls, lay them out to form a round-ish shape.
6) Glue the curls together, taking time again to pinch the pieces together for a few seconds to help the glue set.
7) Add a stem and a few green paper curls.
Source: OneCreativeMommy.com
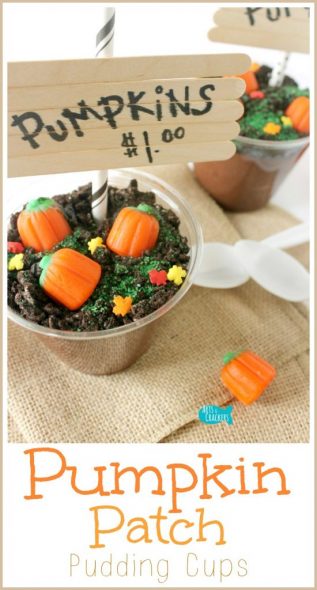
Pumpkin Patch Pudding Cups
What You Need:
Clear plastic cups
Chocolate pudding
Chocolate cream cookies
Green sugar crystal sprinkles
Mellowcreme pumpkins
Green gel (optional)
Fall leaf sprinkles (optional)
Paper straw
Craft sticks (5 each)
Hot glue
Paint or paint pen
Directions
1. To begin the pumpkin patch pudding cups, prepare soft-serve chocolate pudding (I just used instant pudding) and fill the cups about about 3/4 full.
2. Crush up some chocolate cream cookies using your fist, a spoon, or a food processor. This is a fun activity to get kids involved in, especially if you use a hammer.
3. Sprinkle a decent amount of cookie crumbs onto the top of the pumpkin patch pudding. This will be the “dirt.”
4. Most pumpkin patches have a little bit of grass still with the pumpkins, not just dirt, so add some of the green sprinkles around the top of your pumpkin patch pudding cup. I did some spots with none, some with very little, and others with a decent amount so it looks more like grass would.
5. Place a few mellowcreme pumpkins on the top of your pumpkin patch pudding and push them down gently into the “dirt” like they are sitting in a pumpkin patch. If you can find different sized/shaped pumpkins, that would be even better! I just went with whatever was in the Autumn Mix Mellowcreme and candy corn package that I purchased. You can also add some green gel for vines and sprinkle on some leaf-shaped sprinkles if you wish!
6. While the pudding sets, make the pumpkin patch signs! Start by gluing the craft sticks onto the paper straw. Make sure these are centered and that they each touch. Leave a small amount of the straw poking out from the top and a good amount below as it will be sticking into the pudding.
7. If you would like to make the signs sturdier, flip the sign around and add some more glue around where the straw meets the craft sticks.
8. Flip the sign back around. Using the paint or paint pen, write “Pumpkins $1.00” onto the sign. Let dry.
9. Once the Pumpkin Patch Pudding has set, carefully stick the sign in near the back. If needed, place the pudding cup back into the refrigerator for a bit so the sign does not fall over.
10. Serve chilled.
Source: ArtsCrackers.com
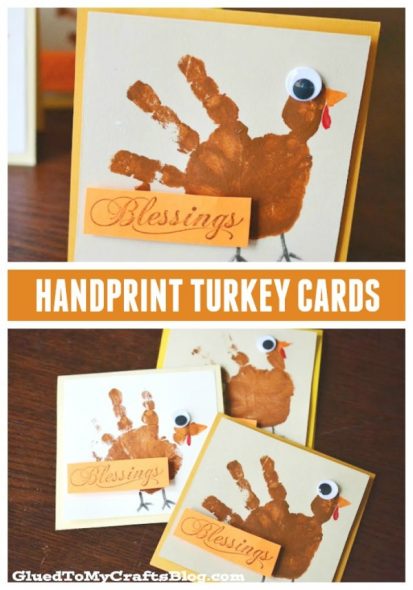
Handprint Turkey Cards
What You Need:
Cardstock
Craft Paints {Brown, Red, Orange}
Paint Brush
Sharpie
Baby Wipes
Wiggle Eyes
White School Glue/Glue Stick
Embellishments for card – stamps, ink, pop up dots etc
Directions:
* If you are going to make cards – first cut and fold your cardstock for the cards. Set aside a cut piece for your handprint.
* Paint your child’s handprint and press onto the set aside piece of cardstock. Let dry completely.
* Once dry – add the turkey embellishments. The thumb is the head of the turkey – while the other fingers are the feathers. Glue on the eyes and paint on the additional parts. Don’t forget the legs!
* Once done – glue your card together and add your sentiments.
Source: GluedToMyCraftsBlog.com
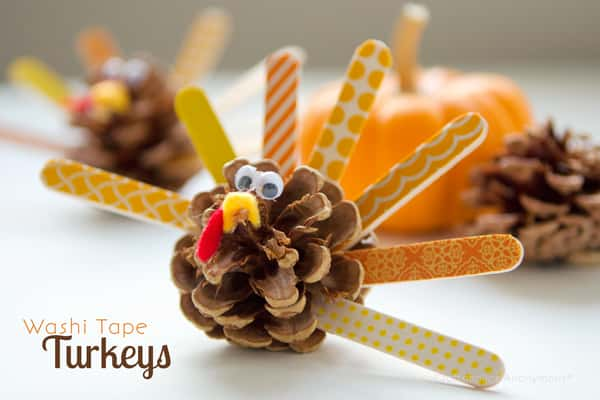 Washi Tape Pinecone Turkeys
What You Need:
Washi tape {I used 7 different patterns}
Pinecones
Hot glue gun
Scissors
Exacto knife
Popsicle sticks
Yellow felt
Red felt
Small googley eyes
Directions:
1) Use an exacto knife to cut 4 popsicles sticks in half.
2) Place a popsicle half on the sticky side of the washi tape and press firmly.
3) Then use an exacto knife and cut around the popsicle stick.
4) Repeat with remaining popsicle stick halves so that they are covered with washi tape.
5) Cut a small triangle of yellow felt for a beak and a red gobble. {is that what it’s called? I’m not sure! That’s what I call it.}
6) Hot glue 2 googley eyes onto one end of the pinecone. Fold the yellow felt beak triangle in half and glue to the pinecone. Then glue on the gobble over the beak. Then hot glue the washi tape popsicles sticks into the middle of the pinecone. And you have cute little Washi tape pinecone turkeys!
Source: CraftaholicsAnonymous.net
Which craft are you going to try with your kiddos? Let me know in a comment below!
Until next time!